

The Dell XPS 13 9310 is a highly acclaimed notebook that is designed for the highest performance and productivity.
The Tech specs of this laptop are,
- 13.4-inch UHD+ display
- 11th Gen Intel Core CPUs
- up to 16GB of RAM
- up to 2 TB NVMe SSD
- Intel Iris Xe Graphics
- Widescreen HD 720p webcam.
This is a great choice for gamers, professionals, and University students alike. While the Dell XPS 13 9310 is a well-built and accurate laptop, disassembly may be required for replacements, upgrades, or cleaning.
You may follow along with us as we disassemble the Dell XPS 13 9310 in the following sections.
Table of Contents
We will give you the types of equipment, safeguards, and methods required to make sure of a safe and effective disassembly process. We know the significance of appropriate disassembly and reassembly in ensuring that your laptop performs ideally and for a longer period of time.
Tools Required for Disassembly
It is essential to have the proper tools before we start the disassembly procedure. The list of equipment needed to dismantle the Dell XPS 13 9310 is as follows:
- Phillips head screwdriver – used to remove screws
- Spudger – a tool designed to pry and disconnect components
- Plastic opening tool – used to separate components without scratching them
- Torx T5 screwdriver – used to remove specialized screws
- Torx T3 screwdriver – used to remove specialized screws
Each tool has a specific purpose and will be required at different stages of the disassembly process.
The Phillips head screwdriver is used to remove screws that hold the laptop components in place, while the Spudger and Plastic opening tool is used to pry and disconnect components without causing damage.
The Torx T5 and Torx T3 screwdrivers are used to remove specialized screws that are found in certain areas of the laptop, such as the display assembly and motherboard.
The disassembly procedure will be considerably simpler and less dangerous if you have these tools on hand.
Lap Launch
Precautions Before Disassembly
To guarantee a safe and successful disassembly procedure, various safety measures must be done before we start the disassembly process. The safety precautions are as follows:
- Backing up Important data – Before disassembling your Dell XPS 13 9310, it is important to back up your data. Because the disassembly process may necessitate the removal of the storage device. If that happens any data stored on the device may be lost.
- Shut down the laptop – It is important to shut down the computer properly before starting the disassembly process. This will help prevent any damage to the components due to residual power or data corruption.
- Remove external Components – Disconnect any external devices such as USB drives, external hard drives, External DVD writers, and power cables. This will guarantee that your workplace is uncluttered and that no external components are at risk of being harmed.
- Grounding Precautions – It is important to ground yourself before starting the disassembly process. This will prevent any static electricity from damaging the components. You can do this by touching a grounded metal surface or by wearing an anti-static wrist strap.
Disassembly Steps
Now that we have taken the necessary precautions, let’s begin the disassembly process of the Dell XPS 13 9310. Let’s get started.
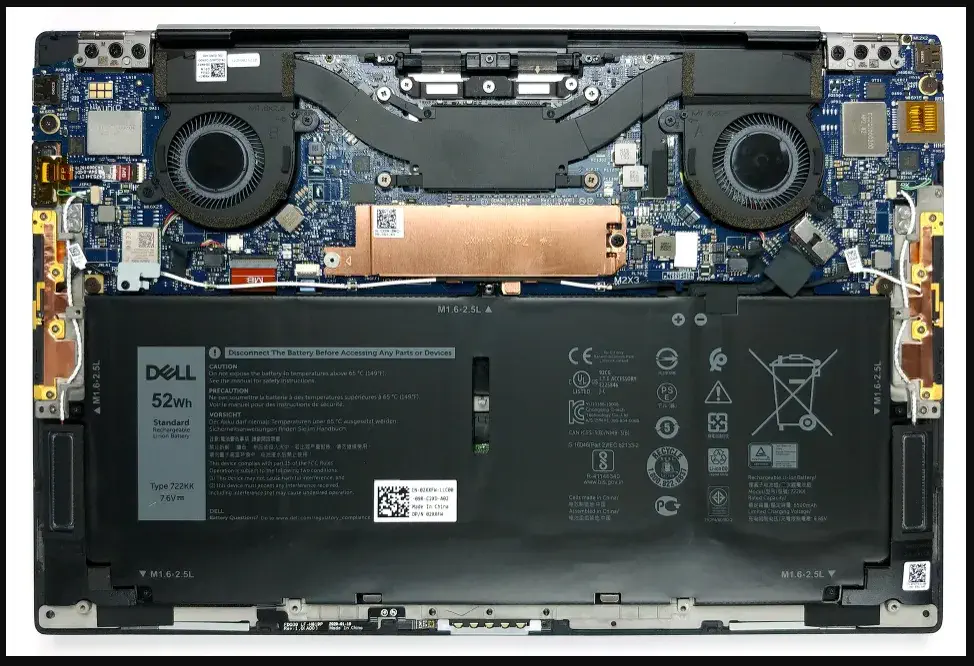
Remove the bottom cover:
- First, remove the screws using a Phillips head screwdriver.
- Then Use a plastic opening tool to gently pry off the bottom cover from the laptop.
Disconnect the battery:
- First, remove the screws using a Phillips head screwdriver.
- Then Carefully unplug the battery connector from the motherboard.
Remove the heat sink and fan:
- First, remove the screws using a Phillips head screwdriver.
- Then Carefully unplug the fan connector from the motherboard.
- Now Lift up the heat sink and fan assembly to remove it from the laptop.
Remove the SSD:
- First, remove the screws using a Phillips head screwdriver.
- Then Carefully unplug the SSD connector from the motherboard.
- Now Lift up the SSD to remove it from the laptop.
Remove the wireless card:
- First, remove the screws using a Phillips head screwdriver.
- Then Carefully unplug the wireless card connectors from the motherboard.
- Now Lift up the wireless card to remove it from the laptop.
Remove the display assembly:
- First, remove the screws using a Torx T5 screwdriver.
- Then Carefully unplug the display cable connector from the motherboard.
- Now Lift up the display assembly to remove it from the laptop.
Remove the motherboard:
- First, remove the screws using a Phillips head screwdriver.
- Then Carefully unplug all the connectors from the motherboard.
- Now Lift up the motherboard to remove it from the laptop.
Special Tip:- Make sure to keep all the components in a safe and organized place to ensure that you can easily reassemble the laptop after Disassemble process.
Reassembly Steps
You can do it by watching this tutorial.
Conclusion
In conclusion, it might be difficult to disassemble a laptop like the Dell XPS 13 9310, but it is doable with the correct equipment, safety measures, and procedures. Proper laptop disassembly and reassembly are essential since it guarantees that the components are not harmed throughout the process.
When upgrading or replacing any of the components, careful disassembly and reassembly can help you prevent issues or hassles brought on by incorrect installation. It is recommended that you have some experience with electronics or have someone with experience assist you with the disassembly process. Keep the components in a secure and tidy location so that you can simply reassemble the laptop.
With the right tools, precautions, and steps, disassembling the Dell XPS 13 9310 is possible and can be done safely and successfully.
FAQs
- Can I use any screwdriver to disassemble the laptop?
- Yeah. But use the right size screwdriver for each screw.
- Do I need to disconnect the battery before disassembling the laptop?
- Yes, it is important to disconnect the battery before disassembling the laptop to prevent any electrical damage.
- Can I reuse the thermal paste on the heat sink when reassembling the laptop?
- No, it is important.